Saturday, July 6, 2019

Catch You Up With the Window


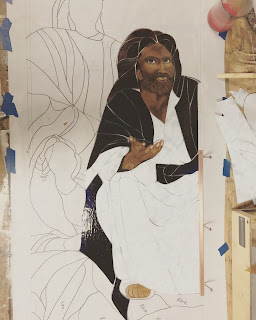
Christ is dark enough and is ready for color, to cheeks and lips.


The older boy and youngest girl faces are also ready for color.


The cutting and fitting of garments have begun.


He appears dark flat on the table.  The robe is a beautiful regal blue, white gown.
Continuing with the older boy.

Thank you for following along.


Friday, July 5, 2019

Finishing QT k-9 portrait in Glass


All of this is stained, ‘painted’ in other words, with crushed and powdered glass.  Not traditional paints.  They are permanently fused into the clear glass canvas with high temperatures of the kiln.

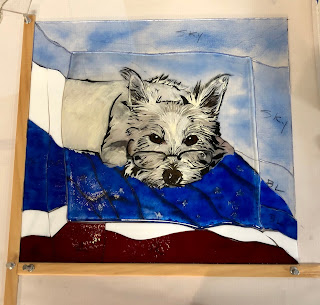
The very center, where QT lays is one panel.  The other pieces will frame it and this project will hang in a window.


All the other pieces are cut and in place ready to foil and solder.


Ready to frame.


Completed and ready to mail!
All I need is your picture and either a box or panel can be created for your collection or for a special gift.
Contact me:  mshemeral@midstatesd.net 


Thursday, July 4, 2019

Finishing the Special Couple Box


In the last post about the Special Couple box we had not added any of the blue colors .  Once the blue was added, it took about 3 firings in the kiln to get the colors deep enough to my liking.
The blues were the last colors to add.

On to building the box itself.


Originally I thought I would use clear bevels but, the very clear did not appeal to me and I changed over to this milky white.  Which has a bit of translucent qualities that will illuminate the lid nicely yet offer the contents a bit of privacy.


This box being a bit larger than most are that I work up, deserved a box on box lid.  Meaning each, lid and bottom, are boxes but fit onto each other.
At this point the lid might have a hinge added but, due to the weight of this project I tried a lift off lid.
I added posts inside to keep the lid from sliding off.
Genius right!

The post is in the corner.

The edges are sculpted to add visual and tactile texture.
Then it has acid washed and I color the copper in my signature blend and polish and we are done!


Monday, June 17, 2019

Brining You Up to Speed for the Large Chapel Window Unit


Let me refresh you where this project begins.

With drawing that I will use continually as references throughout the construction.


There are portrait drawings that are used for staining the faces for the final window.  As well as reference for cutting the garments that will go in place.

First the faces need to be completed before the unit can begin final stages of construction.


In the first staining the reference marks are laid on the glass.  The stain is crushed glass powder that is fired at high temperatures in a kiln that melts the crushed glass into the substrate glass leaving the design.

successive firings doing the same thing will darken the image.


The process is continued through several firings getting the face darker.


And darker.
 
 
And darker.
 

Where the piece rests at this time.  On the light box, I can judge how the sun might come through and if the shading is too light still, or right.

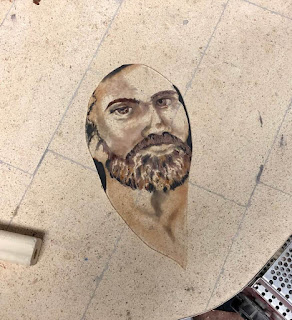
He will need another stain treatment and kiln firing but, I can begin to add more character to his features as, he is almost dark enough.

I am working on the other two faces and the dove getting them to the finished stage and then we begin cutting glass for the rest of the unit.

Thank you for following along.

Sunday, June 9, 2019

Our Special Couple


Our special couple is sister to who is giving the surprise gift treasure box.

Let me take you through their steps, as she is making them a booklet of the process.  This post is just for them.


Beginning with a reference photo, I take from this what will be the best once I have adapted to the size of the box that will be made.

Everything about the treasure box is glass and metal.  There is zero paint involved.
The paint is staining and the stain is comprised of fine ground glass mixed with minerals and ores that strike the intended color onto the substrate (clear) glass used as the "canvas".

Beginning with a reference outline, that is fired in the kiln to 1300 degrees melting the chips down into the clear glass and permanent.


I begin to slowly build up the composition


This last picture might be a tad blurry from the reflection of the lights.  See the two tones of the jacket the yellow and whites of the sweater, the build up in the hair and finally some skin.

Next additions are the lower firing minerals that will add colors.

Everything about using this method that dates back to the Egyptian era, is planning out mineral and ore strikes that color our project but fire at different kiln temperatures.  If you fire a mineral that strikes at 1000 degrees to 1300 degrees, then the color will evaporate.  The glass stays but without color.

Stay tuned we are adding blues next!!!

If you wish to be better notified about blog posts then please follow or at times I do post a newsletter.  You can sign up for that on the main website.
www.stagecoachplatte.com

Thank you for visiting!


Tuesday, June 4, 2019

Moving Forward with the Other Tables Project


When you look at the pieces I am creating on glass, I am using powder glass mixed with oil that strikes the color and design once it is fired in the kiln to melt it down into the substrate glass.

This is not paint although it looks as if it might be.

It is properly referred to as, staining.

Minerals and ores mixed with powdered/crushed glass, create the color.  The color surfaces from different temperatures.
A kiln is used to reach the desired temperature.


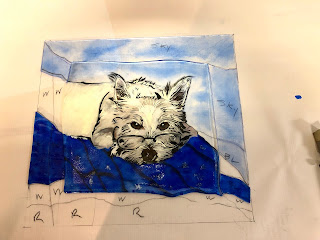
The growth of QT is a bit more advanced than the couple, as she is mostly the white color.

The colors as I mentioned are chopped and mixed with oils.  Each artists prefers their brand of oil to use and that become determined through their own experimentation.
The style for application has a specific method, however that can also become interpreted to each artist depending on their style and taste.

I explain this because I break from the pack and have a different style than most for applying my stains to the glass.

What I will show you is again, not "painted" but applied.
Chip by chip, drip by drip.
I use different brushes to move the elixir around until I am satisfied, then the oil evaporates off and I fire the powder residue left.

The technical stuff and chemistry and schedules I will leave off the explanation but, know there is more to this process than meets the eye.

A very labor intensive process but worth the results.


In the previous post we saw QT in her first fire in the kiln.
Here she is after many hours of application but, not yet ready for the next kiln visit.


Here she is ready for the next kiln visit.

I hope you are enjoying the process.

Thank you for visiting.

If you feel inclined, please share the link.


Saturday, June 1, 2019

On the Other Table


In addition to working on the chapel Window Unit, I am working on 2 other special order pieces.

1.  Celebrating life.  A special gift from her sister.


The first application of glass in the first kiln visit.

Using the reference I am given, I adapt what information will fit the size of the box ordered.

The second project is QT.

A favored doggie who is going to make a very special surprise gift for his wife.
This project is going to be a panel that will hang in their window.
The part I am working on now will be the center of the panel.


Her first firing went in like this.
Using this reference.


They are ready now for another kiln visit.
 
Come on back to see their progress!
 
Thank you

Friday, May 31, 2019

Chapter Nine for the Window Unit


The pigment for the faces and limbs of the characters on the pattern for the window unit will need skin tones.

The board for this chapel requested Native American skin tones for the group and Christ will be a bit Middle Eastern in skin tone.

I worked with mixing different glass pigments to try to decide which ones will be possible contenders.
I kept a few of the best possibilities to work with but, the decision needs to wait until a firing matures the  color strike.

I also worked on the Dove that flies in the arch above the long window.

The dove is shaded and ready to fire along with the legend.


Thank you for following along
:)

Thursday, May 30, 2019

Chapter Eight for the Window Unit Project


Let me catch you up.

Yesterday 3 faces and a hand went into the kiln and fired the next layer into the glass substrate.

I am showing you the placement for them on the pattern, that is used to building the unit.

They may appear dull because the oil has evaporated off the glass leaving just the glass chips.

Once they are fired the glass becomes glossy and vibrant.


Next I am mixing stains to decide the pigment best for skin tone.

Each sample needs firing, so I am making a color board and keeping notes on the formula so once the decision is made I will duplicate the right hue quickly.

Stay tuned I have other works I progress to show you.

Come on back
You KNOW you WANT to!

thank you!


Tuesday, May 28, 2019

Chapter Seven for Window Unit Project


As I add more to the Christ face, you see the definition begin to build.

 
I placed the piece over the pattern where it will sit when it is complete.  You can begin feel a sense of his invitation.


Ready now for the next visit to the kiln.

I have moved on to the next face, the older boy.

Thank you for following along.


Sunday, May 26, 2019

Chapter Six Window Unit Project

From the pieces that went in the kiln of the precious post, I added to the Christ face.

I will add more, even before the next firing.


Let me refresh you to the process.
Using ground to powder glass chips mixed with an oil, I mover the stain around with brushes until I achieve the look I am after.
Then the pieces is placed in the kiln and taken to between 1100 and 1300 degrees to melt the chips into the substrate glass.

I can do layers on layers as many times that I need, but each layer must be kiln fired to become permanent to the glass piece.

Each trip needs to be carefully watched.  I can ruin the piece at every entry into the kiln.
Each time is an adventure.

There are not speckles on this piece the speckles are from the kiln top.

Come by again to follow the story and process.

Saturday, May 25, 2019

Chapter Five Window Unit Project


Now that the blanks are ground and cleaned up ready to stain.
The staining process begins.

Taking crushed to powder glass, I mix an oil with it so I can move the glass around and create the design on the glass.

Shade the piece.
Make the face features or fingers.


The faces showing are for Christ, the youngest girl and the eldest male.  All on panel one. 
My approach for staining glass is a little different than from other Stanier's.
I work more as if I am working on canvas and build the layers slowly.  This process will require more visits to the kiln but, I prefer the effect.

This is the first visit to the kiln.  I have begun where the shading is and some of the features and I will add from here.


Christ hand welcoming ALL.
Typically I am shy about hands but, I think this is turning out pretty well.

All of these pieces have fired and will be added to over the next few days.

Next post I will tell you about a few projects I am working on that will be alternating in the kiln.
These are commissioned box and glass portrait projects.

Come again.
Thank you!

Friday, May 24, 2019

Chapter Four Window Unit Project


Welcome Back!


Now that the patterns have been settled, it is time to begin cutting glass.


After all the glass blanks are cut to the shape designated on the pattern.  There are small nubs that need to be removed.


So it is time to grind them smooth and get them ready to stain.


There is a nifty machine for that.

Thank you for following along!

If this is your first visit to the story, go back to the home page and follow from chapter 1.

Enjoy the process!!


Thursday, May 23, 2019

Chapter Three on New Hope Window Project


Resizing the unit to the new dimensions, resulted in the patterns looking like the above.  I am happy with the results.
The blank spaces are for the faces and hands feet, legs that are stained onto clear glass using my drawings.


The three pictures above show how the blanks will look filled with my drawings, after they are stained onto the glass.

In the next chapter I will show the first layer of staining.

See you there, thank you for following along!


Wednesday, May 22, 2019

Second chapter for New Hope Window Project


After all the decisions are made choosing the glass that will comprise the windows. 
You wait.
And wait.
And wait some more.

FINALLY the day arrived for the crates to arrive!


Eric Reiser brought the pallet from their store Reiser Lumber, as they accepted the shipment for me.
Down the road, to the Stagecoach Gallery back door.
Which was heavenly !! Since I am constructing the windows in the Gallery workshop.

I went to work right away un-crating everything.  All the supplies I need, the frits and foils and zinc, then the yummy stuff, the glass!!


Two crates of glass is in here.
I will select from here any glass I will use to cut and piece together to make our window come to life.

Thank you for following along ♥

You can follow more on FB pages:

Mary Simpson Hunt
and
Stagecoach Gallery


Tuesday, May 21, 2019

New Hope Chapel in Platte, SD

Let me catch you up to speed on the time line for this project.
Way back in October Miss Pat came into the gallery and visited with me about a project she wanted seen through and if I was interested in helping her bring it to life.

Windows for a Chapel being built at the New Hope Christian Camp and Retreat Center.
We discussed the subject matter, Jesus with the Children and how many children she wanted represented.
I did a few examples and she made her decision for Christ and surrounding him 2 boys.  One boy is a bit older in his teens.  The second boy a bit younger and 2 young girls.  One girls a bit younger than the youngest boy and then the youngest girl.

We found out that the window would not be one piece but be comprised of 4 panels making up the one unit.
It was here I explained that the divisions for the 4 panels, while they divided the unit, is seen as a whole by the minds brain.
I know this concept is a little difficult to understand.

It is here I am introduced to the committee for the New Hope Camp.  With the permission of Miss Pat, we came to terms about how they wished the unit for the chapel to represent the children they will be mentoring.
After all these particulars are discussed and come to relative agreement!

November 2, 2018
this project is initiated!


The director for New Hope met me at the Chapel and he gave me the window dimensions and I discussed the sun strength for the direction this unit will face, West.  West windows have strong sun.  This is something that I, as the designer and executor of the construction, need made aware.  So, when I am selecting glass I choose glass that will not wash out.

December 5, 2018
Miss Pat signed the contract, lets roll!


During the winter I accompany Craig to Texas and it is there I worked on patterns.
In April we returned, and I finalized the glass choices and placed that order.
May 18th they arrived at the store.  Thank you to Erin Reiser for delivering them!
And to Reiser Lumber for accepting the freight.
They are 2 doors down from the gallery so this made getting this shipment to me so lovely.
Right to the back door!
Making un-crating a breeze!!!

However, back on May 6th, I meet the director for New Hope at the chapel to trace off the arches for this project.  (each arch even manufactured, are slightly different)
I discover he had given me incorrect measurements.
So I needed to re-design the design to meet the new requirements.  Some of the original design needed to be eliminated to bring forward just the people, to work with in the new smaller amount of window space, so we get a huge impact of the inspiration of Christ with the Children.


The New Patterns
they sit side by side and will have a Cross made to fit over the unit.