Showing posts with label #stainingglass. Show all posts

Monday, June 17, 2019

Brining You Up to Speed for the Large Chapel Window Unit


Let me refresh you where this project begins.

With drawing that I will use continually as references throughout the construction.


There are portrait drawings that are used for staining the faces for the final window.  As well as reference for cutting the garments that will go in place.

First the faces need to be completed before the unit can begin final stages of construction.


In the first staining the reference marks are laid on the glass.  The stain is crushed glass powder that is fired at high temperatures in a kiln that melts the crushed glass into the substrate glass leaving the design.

successive firings doing the same thing will darken the image.


The process is continued through several firings getting the face darker.


And darker.
 
 
And darker.
 

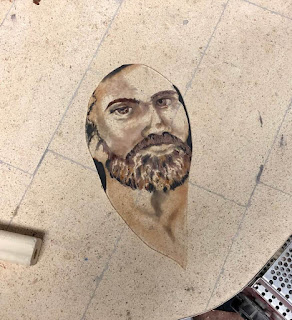
Where the piece rests at this time.  On the light box, I can judge how the sun might come through and if the shading is too light still, or right.

He will need another stain treatment and kiln firing but, I can begin to add more character to his features as, he is almost dark enough.

I am working on the other two faces and the dove getting them to the finished stage and then we begin cutting glass for the rest of the unit.

Thank you for following along.

Sunday, June 9, 2019

Our Special Couple


Our special couple is sister to who is giving the surprise gift treasure box.

Let me take you through their steps, as she is making them a booklet of the process.  This post is just for them.


Beginning with a reference photo, I take from this what will be the best once I have adapted to the size of the box that will be made.

Everything about the treasure box is glass and metal.  There is zero paint involved.
The paint is staining and the stain is comprised of fine ground glass mixed with minerals and ores that strike the intended color onto the substrate (clear) glass used as the "canvas".

Beginning with a reference outline, that is fired in the kiln to 1300 degrees melting the chips down into the clear glass and permanent.


I begin to slowly build up the composition


This last picture might be a tad blurry from the reflection of the lights.  See the two tones of the jacket the yellow and whites of the sweater, the build up in the hair and finally some skin.

Next additions are the lower firing minerals that will add colors.

Everything about using this method that dates back to the Egyptian era, is planning out mineral and ore strikes that color our project but fire at different kiln temperatures.  If you fire a mineral that strikes at 1000 degrees to 1300 degrees, then the color will evaporate.  The glass stays but without color.

Stay tuned we are adding blues next!!!

If you wish to be better notified about blog posts then please follow or at times I do post a newsletter.  You can sign up for that on the main website.
www.stagecoachplatte.com

Thank you for visiting!


Thursday, May 30, 2019

Chapter Eight for the Window Unit Project


Let me catch you up.

Yesterday 3 faces and a hand went into the kiln and fired the next layer into the glass substrate.

I am showing you the placement for them on the pattern, that is used to building the unit.

They may appear dull because the oil has evaporated off the glass leaving just the glass chips.

Once they are fired the glass becomes glossy and vibrant.


Next I am mixing stains to decide the pigment best for skin tone.

Each sample needs firing, so I am making a color board and keeping notes on the formula so once the decision is made I will duplicate the right hue quickly.

Stay tuned I have other works I progress to show you.

Come on back
You KNOW you WANT to!

thank you!


Tuesday, May 28, 2019

Chapter Seven for Window Unit Project


As I add more to the Christ face, you see the definition begin to build.

 
I placed the piece over the pattern where it will sit when it is complete.  You can begin feel a sense of his invitation.


Ready now for the next visit to the kiln.

I have moved on to the next face, the older boy.

Thank you for following along.


Saturday, May 25, 2019

Chapter Five Window Unit Project


Now that the blanks are ground and cleaned up ready to stain.
The staining process begins.

Taking crushed to powder glass, I mix an oil with it so I can move the glass around and create the design on the glass.

Shade the piece.
Make the face features or fingers.


The faces showing are for Christ, the youngest girl and the eldest male.  All on panel one. 
My approach for staining glass is a little different than from other Stanier's.
I work more as if I am working on canvas and build the layers slowly.  This process will require more visits to the kiln but, I prefer the effect.

This is the first visit to the kiln.  I have begun where the shading is and some of the features and I will add from here.


Christ hand welcoming ALL.
Typically I am shy about hands but, I think this is turning out pretty well.

All of these pieces have fired and will be added to over the next few days.

Next post I will tell you about a few projects I am working on that will be alternating in the kiln.
These are commissioned box and glass portrait projects.

Come again.
Thank you!

Thursday, May 23, 2019

Chapter Three on New Hope Window Project


Resizing the unit to the new dimensions, resulted in the patterns looking like the above.  I am happy with the results.
The blank spaces are for the faces and hands feet, legs that are stained onto clear glass using my drawings.


The three pictures above show how the blanks will look filled with my drawings, after they are stained onto the glass.

In the next chapter I will show the first layer of staining.

See you there, thank you for following along!